
Angular 2 and Typescript in action - Modules and Components
In this article I will first give you a brief introduction on Modules and Components, and then I will show you
how to code them in Angular 2 using Typescript.
Others metadata properties of a @Component are:
To clone and start the sample project type the following command in the terminal:
Browsing in the src folder of the sample project you will see the 2 following files.
As already mentioned, the selector metadata defines the HTML tag of your component, and in this case because is the root component of our app, is also the tag that we have to include in the index.html, as you can see in the index below.
With the styles properties you can define the CSS of your component, you can alternatively also define it inside the template.
The template tag define the HTML of your component, in this case is just a text but you can define also complex structure with it, just remember to avoid the error to use the ` symbol instead of the ' when you include the HTML.
TemplateUrl and styleUrls define the name of the external CSS and HTML files. The path is the relative path starting from the position of your component.
The moduleId property is necessary when you define HTML or CSS as external files because his value is used by Angular 2 to evaluate the component path before the component is constructed, without it the framework would try to load the files from the application root. Keep in mind that the value to assign to the moduleId it's different if you decide to use SystemJs as module solver instead of CommonJS as in this example.
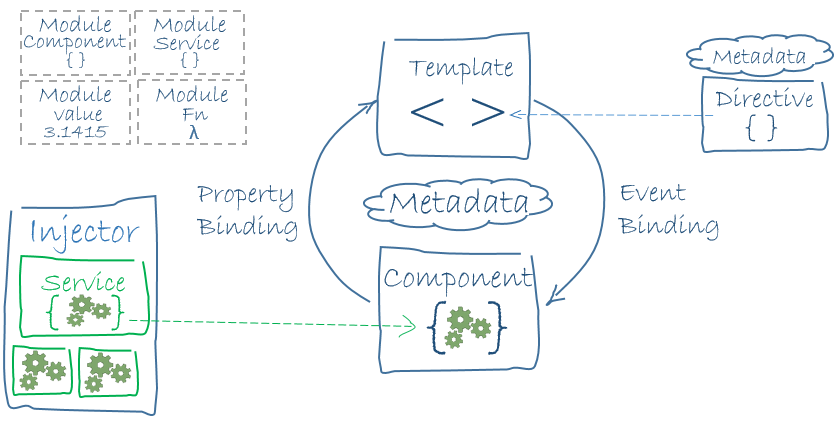
Angular 2 architecture
Before we start to get in context I want to show you the eight fundamentals blocks of the Angular 2 architecture.- Module
- Component
- Template
- Metadata
- Data Binding
- Directive
- Service
- Dependency Injection
Module:
Angular 2 apps are composed of modules. Modularity helps you to improve the separation of concerns, and also to reduce the scope of your block of code. As a module you can export class, function and values, often modules can also be libraries of other modules. But typically a module export a class that you can import and consume in other modules, example:
cpu.ts

    export class Cpu {
        mhz: number;
    }
computer.ts

    import { Cpu } from "./cpu.ts"

    export class Computer {

        constructor(cpu: Cpu) {
        }
    }
Component:
Components are one of the three types of directive available in Angular 2:- Components directive
- Structural directives
- Attribute directives
Others metadata properties of a @Component are:
- selector
- moduleId
- viewprovider/provider
- provider
- style/styleUrls
- template/templateUrl
- directives
Prerequisites to use Angular 2
In order to write and run an Angular 2 app, you need Node.js and npm installed on your machine. If you want to know how to install both of them please follow this guide on how to install npm and Node.js .Show me the code!!
The code in this article is written in typescript. You can write Angular 2 in all the language supported by the framework, I choose typescript because remember me Java which I know well. Let’s start cloning a quick start project for Angular 2: https://github.com/magemello/angular2 -sample-project . This will save us the time needed to configure the project and will give us more time to focus on the code.To clone and start the sample project type the following command in the terminal:
    git clone https://github.com/magemello/angular2-sample-project
    cd angular2-sample-project
    npm install
    npm start
If everything is working you should see inside your browser the classic hello world text.Browsing in the src folder of the sample project you will see the 2 following files.
main.ts

    import { bootstrap }    from '@angular/platform-browser-dynamic';
    import { AppComponent } from './app.component';

    bootstrap(AppComponent);
app.component.ts

    import { Component } from '@angular/core';

    @Component({
        selector: 'my-app',
        styles: ['h1 { color: red; }'],
        template: `<h1>Hello world</h1>`
    })
    export class AppComponent {
    }
In this 2 files, you can see modularity in action, the app.component.ts is exported and then imported and
consumed by the main.ts.
main.ts:
The main.ts include also the bootstrap function, it tells to Angular what is the root component of your app. In our case, the root component that has to be called is the AppComponent. As second parameter bootstrap accept an array of service provider, but now we are not interested in how services work so I will come back to this topic when we will talk about services in the upcoming articles.app.component.ts:
In this class, we see for the first time the @Component decorator, and 3 of his metadata properties in action : selector, styles and template.As already mentioned, the selector metadata defines the HTML tag of your component, and in this case because is the root component of our app, is also the tag that we have to include in the index.html, as you can see in the index below.
With the styles properties you can define the CSS of your component, you can alternatively also define it inside the template.
The template tag define the HTML of your component, in this case is just a text but you can define also complex structure with it, just remember to avoid the error to use the ` symbol instead of the ' when you include the HTML.
index.html

    <html>
    <head>
    <title>Angular 2 Sample Project</title>
    <meta charset="UTF-8">
    <meta name="viewport" content="width=device-width, initial-scale=1">
    <!-- css -->
    <link rel="stylesheet" href="css/styles.css">

    <!-- Polyfill(s) for older browsers -->
    <script src="node_modules/core-js/client/shim.min.js"></script>

    <script src="node_modules/zone.js/dist/zone.js"></script>
    <script src="node_modules/reflect-metadata/Reflect.js"></script>
    <script src="node_modules/systemjs/dist/system.src.js"></script>

    <!-- Systemjs conf-->
    <script src="systemjs.config.js"></script>
    <script>
    System.import('src').catch(function(err){ console.error(err); });
    </script>
    </head>

    <body>
    <my-app>Loading...</my-app>
    </body>
    </html>
HTML and CSS in external files:
Put together HTML, CSS and javascript it works for small application, but doesn't scale when things get complicated. So let's see how we can move the HTML and CSS of our app.component.ts in external files. If you want to see the following code switch on the external-html-css branch of the git project that you downloaded before.
app.component.ts

    import { Component } from '@angular/core';

    @Component({
        moduleId: module.id,
        selector: 'my-app',
        templateUrl: './app.component.html',
        styleUrls: ['./app.component.css']
    })
    export class AppComponent {
    }
app.component.html

    <h1>Hello world</h1>
app.component.css

    h1 {
        color: red;
    }
With this solution we have introduced also 3 more metadata properties : moduleId, templateUrl and
styleUrls.TemplateUrl and styleUrls define the name of the external CSS and HTML files. The path is the relative path starting from the position of your component.
The moduleId property is necessary when you define HTML or CSS as external files because his value is used by Angular 2 to evaluate the component path before the component is constructed, without it the framework would try to load the files from the application root. Keep in mind that the value to assign to the moduleId it's different if you decide to use SystemJs as module solver instead of CommonJS as in this example.